![]()
CREATING
A NEW TRACK
(Page
1)
Now that we have an understanding of what
data is contained in the .TRK file and how that data is interpreted by Formula
PC, it's time to start creating a new track.
If you didn't read the primer
on The .TRK File Format,
shame on you. Continue at your own risk
We'll start by creating a simple oval.
Our track will have 2 straights and two 180° turns. It will also have a pit
lane and a group of 10 garages.
Designing a simple track will introduce you
to the fundamental components of track creation and how to use the tools available
in the Track Designer.
GETTING STARTED
Open
the Formula PC Track Designer.
|
Select the New 3-Lane Track button. |
|
|
|
|
|
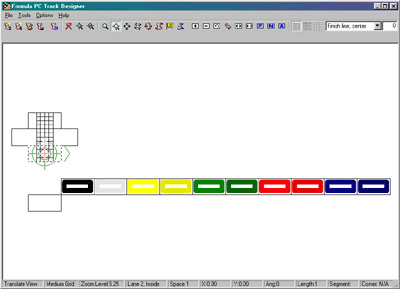
You will now see the foundation for a 3-Lane Track. |
|
We start with the first Pit lane space, a set of 10 Garages, the first space of the Inside lane, the first 2 spaces of the Middle lane and the first space of the Outside lane. You should also see new items on the toolbar and all of the commands in the menus are now available.
The initial spaces of the Inside, Middle and Outside lanes have the finish line on them. It is very important that the finish line reside on these spaces, because Formula PC doesn't actually look for a Finish Line symbol to detect when a lap has been completed, it simply looks to see if the car has crossed the first space of a lane, so always leave the finish lines at their default location.
The Garages may also look a bit odd. This is because they are painted with 10 different colors rather than the 5 used by Formula De. The reason for this is because Formula PC is capable of supporting up to 10 different teams (rather than Formula De's limit of 5) so a Garage space must be available for each competing team. The Garages are paired up, with one half being painted a lighter shade. If 5 or fewer teams are competing, then Formula PC simply paints both halves of the garage pair the same color and each driver on the team gets his own Garage..
EXPLANATION
OF THE TRACK DESIGNER INTERFACE
Before we start
editing, let's take a look at all the menus and toolbar buttons so you know
all the tools available to you.
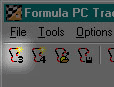
|
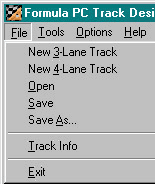
File Menu |
|
|
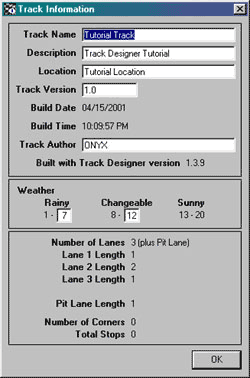
Go ahead and select the Track Info command. This brings up the Track Info dialog. Track Info
Dialog You'll notice that certain items are displayed, but are not available for entry. This information is automatically inserted by the Track Designer and is meant as a report to the designer (and later to the game players). |
|
|
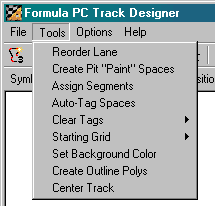
Tools menu Each of these tools will be discussed in detail later as we use them, but here are brief descriptions: |
|
Reorder Lane
This
command automatically sets the Position Value of all spaces of a lane that follow
the currently-selected space. As we noted earlier, the Position Value of spaces
on the lane often needs to be modified to contend with corners. Once you have
manually set all the Position Values in a corner, you can use the Reorder Lane
command rather than having to continue setting values for the following spaces.
Create Pit "Paint" Spaces
Once
the Pit lane has been created and is of suffucient length (at least 12 spaces),
you can select the first space where Pit "Paint" should be placed
and use this tool to create all 10 Pit "Paint" spaces at once.
Assign Segments
This
command is used to assign the appropriate segment number to each space on the
track. Before using this command you must have placed Space Symbols on all
spaces so that the corners are marked.
Auto-Tag Spaces
Rather
than having to manually set the "Next" and "Adjacent" values
for every space on the track, this command will automatically set most of these
tags. This tool only functions on the straights, since there is simply no way
for the program to determine "Next" and "Adjacent" spaces
in the corners, but it saves a great deal of work. Before using this command
you *must* have all space Position Values and Segments assigned.
Clear Tags
The
sub-menu allows you to clear all "Next" and "Adjacent" tags
for the entire track, for straights or for corners only. This is helpful when
you need to reset the tags for large areas of the track which would take some
time to do manually.
Starting Grid
Once
the Pole Position and 2nd place starting grid spaces are created, this sub-menu
allows you to create a normal starting grid (2 blank spaces between each grid
space) or a tight grid (1 blank space between each grid space). There is also
an option to clear the entire grid, saving time if you need to recreate the
grid from scratch.
Set Background Color
Sets
the Background Color displayed behind the track. This value defaults to the
standard "Grass" color used in Formula PC, but if you want to use
a different color (i.e.: blue for a track surrounded more by water than land)
then this command will allow you to do so.
Create Outline Polys
This
creates 2 polys that outline the track. One functions to create a "concrete"
layer beneath the track spaces, the other creates a grass infield. This is meant
to be used after the entire track has been laid out.
Center Track
Once
a track has been created, use this command to center it in the view. Usually
when you create a track it ends up off to one side of the screen. It's best
to center it when all is said and done, that way it will come up nice and centered
in Formula PC.
|
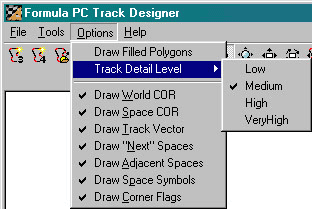
Options
Menu |
|
Draw Filled Polygons/Draw Wireframe
By
default, the Track Designer draws all spaces and polygons as wireframes, making
it faster and easier to see everything. As you design it is sometimes helpful
to see all the objects the way they will be shown in Formula PC. Setting this
switch to Draw Filled Polygons will give you a view similar to the one that
will be shown in the game.
(This can also be accomplished by pressing ![]() ).
).
Track Detail Level
Allows
you to set the detail level just like the Options dialog does in Formula PC.
This way you can see what polygons will appear at differing detail levels.
Draw World COR
Turns
on/off the drawing of the green crosshairs at the origin (0,0). When rotating
the entire track, the rotation takes place about the World Center of Rotation
(the origin).
Draw Space COR
Turns
on/off the drawing of the red crosshairs of the current Space Center of Rotation.
This is the point about which rotation takes place when rotating a space and
is *very* important when creating curves in the track.
Draw Track Vector
Turns
on/off the drawing of the green arrowhead that denotes the "direction"
of the track. As you add spaces to the track, this is the direction in which
they will be appended to the lane.
Draw "Next" Spaces
Turns
on/off the drawing of blue N's on "Next" spaces. This only functions
once you have set a space as the "Primary".
Draw Adjacent Spaces
Turns
on/off the drawing of blue A's on Adjacent spaces. This only functions once
you have set a space as the "Primary".
Draw Space Symbols
Turns
on/off the drawing of symbols on spaces (corner arrows, finish line, etc).
Draw Corner Flags
Turns
on/off the drawing of the yellow corner flags around the track. When this option
is turned on, small flags will be drawn on spaces that are a part of the currently-selected
corner. Before spaces are recognized as being part of a corner, Large Corner
Flags must be created and Segments must be set.
|
Toolbar
1 |
|
(From left to right)
New 3-Lane Track
Creates
a new 3-Lane Track.
New 4-Lane Track
Creates
a new 4-Lane Track.
Open Track File
Opens
an existing track file from disk.
Save Track File
Saves
the current track to disk.
Track Info
Brings
up the "Track Info" dialog.
Refresh View
Refreshes
the drawing area. Sometimes, after certain operations, the view may need to
be redrawn. This allows you to manually initiate a redraw.
(This can also
be accomplished by pressing ![]() ).
).
Center View
Centers
the view about the origin (green World COR crosshairs).
(This can also be
accomplished by pressing ![]() ).
).
Center Space
Centers
the view about the currently-selected space.
Zoom Mode
Click
and drag up and down in the view window to zoom the view in and out. (Zooming
in and out can also be accomplished with the + and - keys).
Pan Mode
Click
and drag in the view window to move the view around.
(This can also be accomplished
with ![]() .
Pressing
.
Pressing ![]() moves
the view in larger increments).
moves
the view in larger increments).
Translate Space Mode
Click
and drag in the view window to move the current space around. This will also
move any following spaces on same lane. To only move the current space, press
SHIFT while dragging.
Rotate Space Mode
Click
and drag left and right in the view window to rotate the current space about
the currently-selected Center of Rotation (red Space COR crosshairs). This will
also rotate any following spaces on same lane. To only rotate the current space,
press ![]() while
dragging.
while
dragging.
Translate Track Mode
Click
and drag in the view window to move the entire track around.
Rotate Track Mode
Click
and drag left and right in the view window to rotate the entire track about
the origin (green World COR crosshairs).
Create/Edit Corner Flags Mode
Click
in the view window to create a corner flag. You will be prompted to enter corner
information (name, stops, etc). You can also click on existing flags to select
them for editing, click and drag to move them, or right-click to edit their
information or delete them.
Polygon Mode
Brings
up the Polygon Toolbar, which has tools for creating/editing Background Polygons.
|
Toolbar 1 |
|
(From left to right)
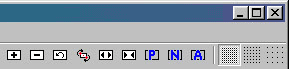
Add Space
Adds
a new space, or applies changes to the current space to the track.
(This
can also be accomplished by pressing ![]() or
right-clicking the mouse in the view window).
or
right-clicking the mouse in the view window).
Delete Space
Removed
the currently-selected space from the track. Any spaces following the current
space will be shifted to fill the void, so any rotations/translations applied
to the deleted space will be undone.
Reset Space
Resets
the currently-selected space back to its default location/rotation, which is
connected to the previous space. This will also affect any following spaces
on the same lane.
Change Space COR
Moves
the Space Center of Rotation from the center of the space, to each of the 4
corners and back to the center again. This allows the space to be rotated about
5 different points, depending on how the space needs to be "connected"
to the previous one.
Increase Space Length
Increases
the length of the currently-selected space. This is sometimes necessary to "tweak"
spaces so that they fit into the track layout.
Decrease Space Length
Decreases
the length of the currently-selected space. This is sometimes necessary to "tweak"
spaces so that they fit into the track layout.
Set Space as "Primary"
Sets
the space as the "Primary", meaning that other spaces can be tagged
as "Next" and "Adjacent" to it.
(This can also be accomplished
by pressing the ![]() key).
key).
Set Space as "Next"
Once
a "Primary" space has been set, selecting another space and pressing
this button will "tag" it as a valid "Next" move. Only two
spaces can be set as "Next" to any "Primary" (the following
space on a lane is automatically assumed to be a valid "Next" move).
(This can also be accomplished by pressing the ![]() key).
key).
Set Space as "Adjacent"
Once
a "Primary" space has been set, selecting another space and pressing
this button will "tag" it as an "Adjacent" space. When a
car lands in the "Primary" space, "Adjacent" spaces are
any that should be checked to see if they are occupied by another car, thus
causing a Possible Collision Roll.
(This can also be accomplished by pressing
the ![]() key).
key).
Fine Grid
Sets
the grid to fine. The track, individual spaces and polygon vertices can be moved
in very fine increments. Rotations of objects are done in 1° increments.
Medium Grid
Sets
the grid to medium. The track, individual spaces and polygon vertices can be
moved in medium increments. Rotations of objects are done in 5° increments.
Coarse Grid
Sets
the grid to coarse. The track, individual spaces and polygon vertices can be
moved in large increments. Rotations of objects are done in 15° increments.
|
Toolbar 2 |
|
Space Symbol dropdown
Select
the type of symbol to appear on the currently-selected space.
The following symbols can be accomplished via the keyboard:
Regular
Space/Clear the current symbol - ![]()
Arrow,
Single, Heavy - ![]()
Arrow,
Single, Light - ![]()
Arrow,
Double, Left - ![]()
Arrow,
Double, Right - ![]()
Lane Position Value
textbox
Sets the Position Value for the currently-selected space.
|
Toolbar 2 |
|
Starting Grid
dropdown
Select the Starting Grid position that will be assigned to the selected
space.
Gap/Partial
dropdown
Select the Gap-Partial tag that will be assigned to the selected
space.
That completes the rundown of the Track
Designer interface.
Next Page of the Tutorial
Return
to the Contents page
CONTACT:
If you have any questions or comments, please feel free to contact
me: onyx@malagraphixia.com
Formula PC ©2000-2001 ONYX (J Boen) This page
and all items pertaining to Formula PC
are in no way related to or endorsed by EuroGames, the makers of Formula Dé.